You want two monitors running from your laptop. You have tried the dongle route. You have tried daisy-chaining adapters. You have stared at display settings that seem to do nothing. The frustrating part is that this is not hard once you understand what is actually happening, but nobody explains it clearly. This guide does. By the end, you will have dual monitors up, your display layout configured, and a desk that looks like you know what you are doing.
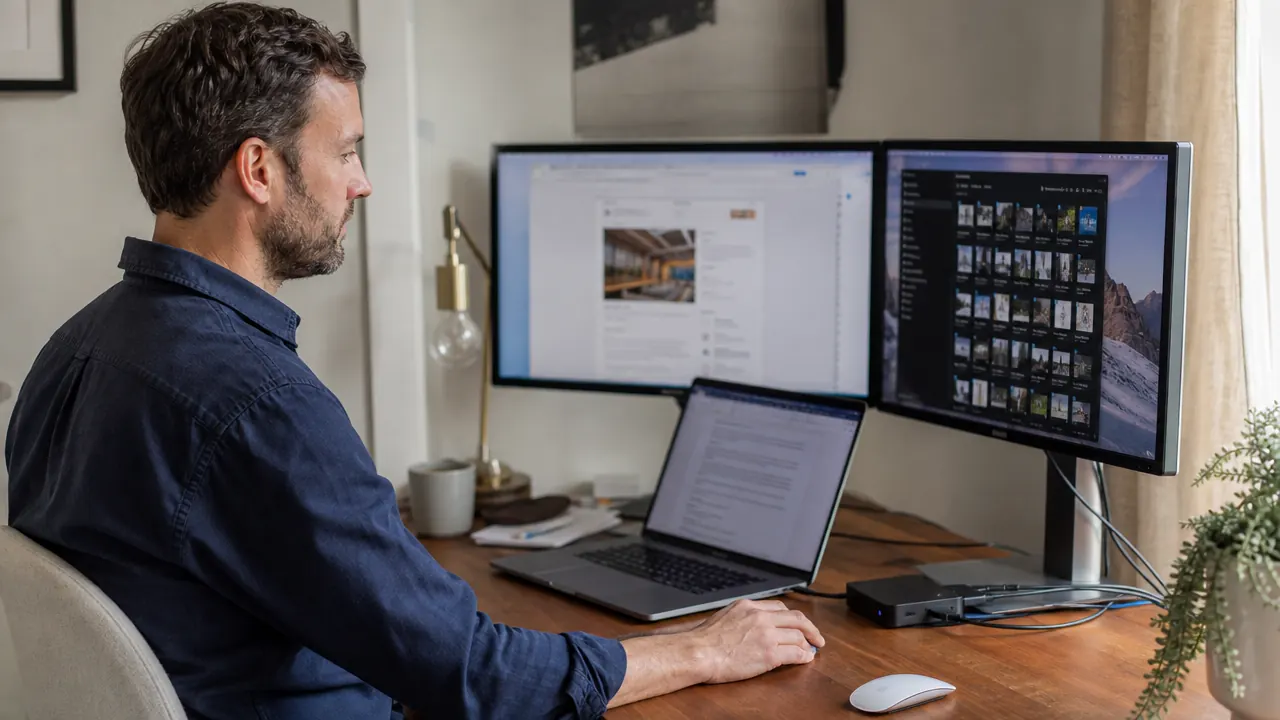
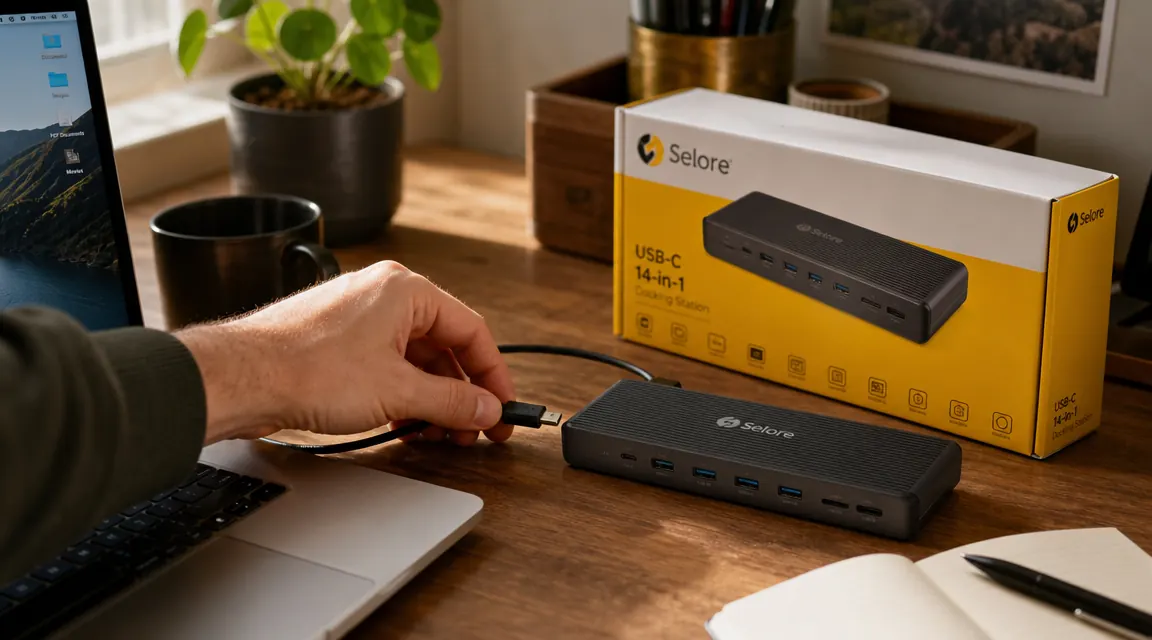
The tool that makes this simple is a USB-C docking station. Specifically, the Selore 14-in-1 USB-C docking station connects dual monitors to a laptop using a single cable. One cable in, two HDMI outputs, 85W of laptop charging, and ten more ports for everything else. That is the setup this guide walks you through.
Done fighting with adapters? One cable fixes the whole desk.
The Selore 14-in-1 USB-C Docking Station supports dual 4K HDMI displays, 85W laptop charging, and 11 other ports. Over 21,000 buyers use it as their single daily-driver connection hub.
Amazon Check Today's Price on Amazon →What You Need Before You Start
Before you plug anything in, confirm two things. First, your laptop has a USB-C port that supports DisplayPort Alt Mode or Thunderbolt. Most laptops sold after 2019 do, but check your spec sheet. If your laptop only has USB-A ports, you need a different solution (a USB-A to HDMI adapter per monitor). Second, your laptop's GPU needs to support dual external displays. Most Intel and AMD integrated graphics chips handle two external monitors fine. Apple M1 and M2 MacBooks have a hardware limit of one external display without a DisplayPort-to-HDMI MST hub. M3 and M4 MacBooks support two external displays natively.
You also need two HDMI cables. The Selore dock has two full-size HDMI 2.0 ports, each capable of 4K at 30Hz or 1080p at 60Hz. If you are running 1080p monitors, any HDMI cable works. If you are running 4K monitors and want 60Hz, use HDMI 2.0 cables (not the cheap HDMI 1.4 cables that often ship with monitors). Most people do not own the right cables already. Worth checking before you sit down to do this.
Step 1: Position the Docking Station on Your Desk
Put the Selore dock somewhere with airflow. It runs warm under heavy load because it is pushing power to two monitors, charging your laptop, and handling USB traffic simultaneously. On a wood desk, give it at least two inches of clear space on each side. Do not put it inside a drawer or a cable box with no ventilation. The dock has a metal shell that acts as a passive heat sink, and it needs air to do that job.
The Selore is 5.5 inches long and less than two inches wide, so it fits cleanly on the back edge of most desks without getting in the way. A lot of people set it behind the laptop or off to one side near the monitor stand. The short USB-C host cable that comes included with the dock reaches about 10 inches, so plan on the dock being within a foot of your laptop's port.
Step 2: Connect the Monitors to the Dock
Run one HDMI cable from the first monitor into the HDMI 1 port on the dock. Run a second HDMI cable from the second monitor into the HDMI 2 port. Do this before you plug the dock into the laptop. It is easier to sort out the physical cable routing when the system is not yet active. Label your cables with a small piece of tape if you want to avoid confusion later: left monitor on HDMI 1, right monitor on HDMI 2.
If one of your monitors uses DisplayPort instead of HDMI, get a DisplayPort-to-HDMI cable (not an adapter dongle, an actual cable). They cost about $10 and work cleanly. The alternative, plugging a DisplayPort-to-HDMI dongle into the dock's HDMI port, sometimes causes detection issues.

Step 3: Plug the Dock Into Your Laptop
Connect the included USB-C host cable from the dock into your laptop's USB-C or Thunderbolt port. Use the port labeled Thunderbolt or the one that also charges your laptop. Those ports carry the full DisplayPort signal the dock needs for video output. If your laptop has multiple USB-C ports, try the one closest to the power side of the machine first. Some laptops restrict video output to one specific port, and the correct one is usually noted in the manual.
The dock powers on immediately when connected. The monitors may flicker once or twice as the system negotiates resolution. Within about 10 seconds, both external displays should show your desktop or a duplicate of it. If neither monitor comes up, skip to the troubleshooting section below.

Step 4: Configure Display Settings on Windows
Right-click anywhere on the desktop and choose Display Settings. Windows will show you a numbered diagram of all detected displays. Your laptop screen is typically Display 1. The two external monitors appear as Display 2 and Display 3. Click Detect if they do not appear automatically. Under Multiple Displays, choose Extend These Displays. This gives each monitor its own independent desktop space, which is what you want for productivity. If you choose Duplicate, both external monitors show the same thing.
Drag the display rectangles in the diagram to match the physical arrangement on your desk. If Monitor 2 is to your left and Monitor 3 is to your right, arrange them accordingly. This controls where your mouse crosses between screens. Set the correct resolution for each monitor (1920x1080 for 1080p, 3840x2160 for 4K). Windows may default to a lower resolution on first connection. Set the refresh rate to 60Hz for 1080p monitors. For 4K monitors on HDMI 2.0, select 30Hz or confirm your cable supports HDMI 2.0 for 60Hz.
Step 5: Configure Display Settings on Mac
Open System Settings, click Displays. Your Mac will show all connected displays. Click Arrange to see the layout diagram. Drag the display icons to match your physical desk arrangement. To use extended mode (separate desktops), make sure Mirror Displays is unchecked. On M3 and M4 MacBooks, both external monitors run natively at full resolution with no extra steps. On M1 and M2 MacBooks, Apple's hardware limit means the second external monitor requires a DisplayPort MST hub between the dock and the second monitor. Without that hub, the second display either does not show up or mirrors the first.
For display resolution on Mac, click on each external monitor icon in the Displays settings and choose the resolution that matches your monitor's native resolution. Mac defaults to a scaled mode that looks slightly softer. Choosing the exact native resolution (shown as '1920 x 1080' or '3840 x 2160') gives the sharpest image. Turning on Night Shift or True Tone applies to the laptop screen but not external monitors unless those monitors support hardware color calibration.
One USB-C cable, two monitors, 85W of charging. The Selore dock turns a cluttered four-adapter mess into a single connection you plug in and forget.
Common Problems and Fixes
One or both monitors show no signal: Check that the HDMI cables are fully seated at both ends. Unplug the USB-C host cable from the laptop, wait five seconds, and reconnect. If that does not help, try a different USB-C port on the laptop. Some ports are USB data only and do not carry video.
Both monitors show the same image (duplicating instead of extending): This is a display settings issue, not a hardware problem. On Windows, go to Display Settings and change Multiple Displays to Extend. On Mac, open Displays in System Settings and uncheck Mirror Displays.
One monitor works, the other does not: Swap the HDMI cables between the two ports on the dock. If the working monitor stops working and the other starts, the issue is with the cable, not the port. Try a different HDMI cable on the problem monitor. If swapping reveals no change, open Display Settings (Windows) or Displays (Mac) and click Detect. Occasionally the OS does not auto-detect a monitor on the second HDMI port after a cold boot.
Laptop stops charging through the dock: The Selore passes 85W of power delivery, but some laptops require more than 85W to both charge and power two monitors simultaneously. Thin high-performance laptops (some Dell XPS, some MSI gaming models) may not charge at full speed under that combined load. The laptop will still charge, just slower than with its original charger. Closing power-hungry applications helps. You can also plug the original laptop charger into the wall alongside the dock, letting the dock handle display and data while the original charger handles power.
What Else Helps
A good monitor light bar reduces the eye strain that comes with staring at two bright screens for hours. Because the Selore dock handles all the cable routing, your desk stays clean enough to add a monitor light without it adding to the mess. The BenQ ScreenBar clips to the top of one monitor and illuminates your desk without creating any screen glare. If you are spending long days at a dual-monitor setup, it makes a real difference. Our full review of the BenQ ScreenBar covers how it works alongside a docking station setup: see the BenQ ScreenBar long-term review.
If you are deciding between the Selore and a similar hub for a dual-monitor home office, the comparison article between the Selore and Anker breaks down exactly where each one wins: see Selore vs Anker USB-C hub comparison. And if you want to understand what else the dock can do beyond dual-monitor output, the listicle covering all ten ways a USB-C docking station cleans up a home office is worth reading: 10 reasons a USB-C docking station cleans up your home office.
For a deeper look at how the Selore performs over months of daily use, not just first-day setup, the long-term review covers heat behavior, driver stability, and whether the ports hold up after heavy use: Selore 14-in-1 USB-C docking station long-term review.
Your two-monitor home office starts with one cable.
The Selore 14-in-1 USB-C Docking Station handles dual 4K HDMI output, 85W laptop charging, USB-A, Ethernet, SD card, and audio, all from a single USB-C connection. Rated 4.4 stars across more than 21,000 reviews.
Amazon Check Today's Price on Amazon →